Backtrack 5 r3 is an operating system (OS) program that we run / install on our computers for operate new functions / programs. Backtrack is Linux type new version operating system that help to check security or pentesting. Backtrack is an favorite operating system of Hackers. Today I'm going to share with you to
How to install / run Backtack 5 on Windows through Virtual Machine step by step guideline.
There we are going to start basic Backtrack OS , you've to downloaded Backtrack & also have a minimum 2 GB Ram in your computer. Hard disk space minimum requirement is only 20 GB show as a partition . Now 1st installVmware in your computer then we will go to start installing Backtrack 5 r3 in your computer.
1 : After installing Vmware / Vmplayer now create a new Virtual Machine. The showing pictures below will help you in installing step by step. Slect Typical (recommended) & click on Next button ...
2 :After click on Next new window will open there Choose installer ISO (Choose Backtrack-5 ISO) & Click Open , as showing below
3 :After click on Open next step will open, there ChooseLinuxas your Guest Operating System type & Ubuntu as versionthen click on NExt
4 :After selecting Operating system & version now give a name & location of your BackTrack VM then click Next to go to next step
4 :Specify virtual hard drive space (20 GB is good enough) . That is minimum requirement . Then click on Next ...
5 : Now final step is there. Now click Finish from ready to create new VM Window.
6 : A Black window will appear there, now hit enter to go boot screen then choose default boot text mode and hit enter (just press single enter button)
7 :Now a Backtrack window will show there, just hit enter at the point that is (Defauld Boot Text Mode)
8 : Type Startxto start GUI (x server) Click to install Backtrack icon or open terminal type sh -c "ubiquity"
9 : Continue like normal installation choose keyboard type and provide location info . If you are installing just Backtrack then go Normally and erase and use entire disk or if you installing Backtrack with other OS then specify partition accordingly (i'm using virtual hard drive)
10 : Now Click forward and click on install
11 : Wait until it finished installing It will take up to 30 minutes depend on your system ...
And finally we install Backtrack , now restart your vm & Enjoy BackTrack 5 on Windows.
1. What's a bot? A bot is a malicious program which has several purposes. They are usually told what to do by a botnet admin although many of the features now are automated.
2. What's a botnet? A botnet is a network of infected computers that all connect to one area where they are commanded by the botnet admin.
3. What can a bot do? Usual features of a bot include...
* P2P Spreading (Limewire, uTorrent, etc.) * IM Spreading (Sends to contacts on MSN, AIM, etc.) * DDoS attacking (See "what's a DDoS attack?") * Spam mailing to lists of emails (Often used to spread) * Collecting personal information (Passwords, bank details and the like)
4. How are bots told what to do? Bots are usually commanded through an IRC channel by the user. Commands are built in and the bots listen for them.
5. What's an IRC channel?
A: IRC stands for Internet Relay Chat. It's like a group messaging
thing although you can also speak to people privately. To use IRC you
need a client like ChatZilla, XChat or mIRC. You then connect to an IRC
server and choose the channel you wish to join.
6. How do I get a botnet?
First you will need a source code and the programs required to compile
it. Most bots are programmed in C++, but you don't need any programming
experience to compile your own. There is usually one file named
"Configs.h" or something similar that you have to edit, that's where you
edit the bot names, the IRC channel and any other necessary
information. Look for bot sources in the botnet section here and they'll
usually come with some form of instructions.
7. Which programming language is useful to create Botnet? Usually they are in Delphi or VB.
8. Is this illegal?
Yes. Mass-spreading a bot illegally and stealing information can get
you into real trouble if you're caught. 99% of the botnets that are shut
down have over 10,000 bots, though, but it's really a challenge to
reach over 5,000. You will have to make sure your IRC server is secure
and that your bot stays undetected.
9. Is it true I can make money from this?
Yes, potentially. You could make the bots visit referral sites or
download files. A lot of people sell the accounts they've taken from
their bots for a price cheaper than the original. You don't have to do
any of this, but as your botnet grows you will need more money to
transfer to a professional IRC host.
10. How can I secure/hide my botnet?
Offshore hosting first of all. Something in a country such as Sweden,
for example. Dedicated hosting would be best, because that way you
aren't sharing your hosted server with anyone and you can hold a much
larger network. A password on your IRC channel is also recommended. Be
sure to use a bot that is undetected, whether you have to crypt it or
not.
11. What do most people use botnets for? The majority
of them are used for DDoS attacks against websites when there are a lot
of them. Many people set up large botnets just to sell their bots,
though. With the rate they spread at, you could sell a large amount of
bots to someone for a nice profit with only a small amount of work done.
12. How can I spread my bot?
Most bots are spread through torrenting websites or warez boards. A lot
of bots also have auto-spread features, so you could have 50 bots and
then gain 150 more through the auto-spreading without doing any work at
all. A lot of people also buy bots off other botnet admins to start
their botnet off with a nice amount.
13. What type of bot would be best?
A: Java bots seem to be the most popular right now since a lot of them
are still fully undetectable, but you have to bear in mind that your
victim will need Java. The same with bots coded in VB.NET, your bots
will need the .NET framework. Some VB6 bots may also need missing .ocx
files, so in my opinion the best choice of bot would be one coded in C++
such as IMBot.
14. How do I configure my bot to connect to my IRC server?
Most bots come with some sort of instructions text file. In the future
we will show you information and detailed tutorials concerning different
bots. However, you can just search the name of your bot. If you can't
find anything, there is usually a file named "config.h" (C++) or
something similar. Open that and edit the parts that you're supposed to,
it should be clear which parts to change. Example: //"server","pass",6667,"channel","channelpass","-ix"; needs to be your info in that order.
15. Is it easy to set everything up?
It is usually easy to configure and compile a bot, but setting up your
IRC server, keeping it secure, paying for larger off-shore hosts,
managing your bots and staying hidden are not easy tasks for beginners.
Once you've done it all several times it will be easier though, as with
anything. There are usually people here who would be able to help you
out if you're having any problems with your bots.
16. Is it like RAT, and can I control hostbot (which control zombie) via an IRC channel ? It is like a RAT, but you can't control them like a RAT and they all connect to one area and you can command them all at once.
17. Is DDoSeR even a botnet? DDoser has nothing to do with a botnet at all.
Windows 8
has been with us for over half a year now, and if you're used to
previous versions of Windows then you're going to notice that quite a
bit has changed. In fact, Windows 8 has seen the biggest change since
the jump from Windows 3.1 to Windows 95.
Out goes the Start menu,
in comes the new touch-oriented Start screen with new Windows 8-style
apps and new interface conventions. Even experienced PC users may be
left feeling a little lost.
Windows 8: what you'll need to relearn
Don't
despair, though, help is at hand. We've poked around every part of
Windows 8, uncovering many of its most important tips and tricks, so
read our guide and you'll soon be equipped to get the most out of
Microsoft's latest release.
1. Lock screen
Windows 8 opens on its lock screen, which looks pretty but unfortunately displays no clues about what to do next.
Windows 8 coverage
Windows 8 reviewWindows 8 vs Windows 7: 8 ways it's different50 Windows 8 tips, tricks and secretsWindows 8 tablets: what you need to knowMaking sense of the Windows 8 versionsAll our Windows 8 content
It's
all very straightforward, though. Just tap the space bar, spin the
mouse wheel or swipe upwards on a touch screen to reveal a regular login
screen with the user name you created during installation. Enter your
password to begin.
2. Basic navigation
Windows 8 launches
with its new interface, all colourful tiles and touch-friendly apps. And
if you're using a tablet then it'll all be very straightforward: just
swipe left or right to scroll the screen, and tap any tile of interest.
On a regular desktop, though, you might alternatively spin the mouse wheel to scroll backwards and forwards.
And
you can also use the keyboard. Press the Home or End keys to jump from
one end of your Start screen to the other, for instance, then use the
cursor keys to select a particular tile, tapping Enter to select it.
Press the Windows key to return to the Start screen; right-click (or
swipe down on) apps you don't need and select Unpin to remove them; and
drag and drop the other tiles around to organise them as you like.
3. App groups
The
Start screen apps are initially displayed in a fairly random order, but
if you'd prefer a more organised life then it's easy to sort them into
custom groups.
You might drag People, Mail, Messaging and Calendar
over to the left-hand side, for instance, to form a separate 'People'
group. Click the 'minus' icon in the bottom right corner of the screen
to zoom out and you'll now find you can drag and drop the new group (or
any of the others) around as a block.
Right-click within the block
(while still zoomed out) and you'll also be able to give the group a
name, which - if you go on to add another 20 or 30 apps to your Start
screen - will make it much easier to find the tools you need.
4. Quick access menu
Right-click
in the bottom left corner (or hold down the Windows key and press X)
for a text-based menu that provides easy access to lots of useful
applets and features: Device Manager, Control Panel, Explorer, the
Search dialog and more.
5. Find your applications
The
Win+X menu is useful, but no substitute for the old Start menu as it
doesn't provide access to your applications. To find this, hold down the
Windows key and press Q or either right-click an empty part of the
Start screen or swipe your finger up from the bottom of the screen and
select 'All Apps' to reveal a scrolling list of all your installed
applications. Browse the various tiles to find what you need and click
the relevant app to launch it.
6. Easy access
Get more
The latest computing news and features from TechRadar
If
there's an application you use all the time then you don't have to
access it via the search system. Pin it to the Start screen and it'll be
available at a click.
Start by typing part of the name of your
application. To access Control Panel, for instance, type 'Control'.
Right-click the 'Control Panel' tile on the Apps Search screen, and
click 'Pin to Start'. If you're using a touchscreen, press and hold the
icon, then flick down and select 'Pin to Start'.
Now press the
Windows key, scroll to the right and you'll see the Control Panel tile
at the far end. Drag and drop this over to the left somewhere if you'd
like it more easily accessible, then click the tile to open the desktop
along with the Control Panel window, and press the Windows key to return
you to the Start screen when you're done.
7. Shutting down
To
shut Windows 8 down, just move the mouse cursor to the bottom right
corner of the screen, click the Settings icon - or just hold down the
Windows key and press I - and you'll see a power button. Click this and
choose 'Shut Down' or 'Restart'.
Some of the tricks available in
previous versions of Windows still apply. Press Ctrl+Alt+Del, for
instance, click the power button in the bottom right-hand corner and
you'll be presented with the same 'Shut Down' and 'Restart' options.
And
if you're on the desktop, press Alt+F4 and you'll be able to choose
'Shut Down', 'Restart', 'Sign Out' or 'Switch User' options.
Customize your tiles
Make
the most of your Windows Start screen tiles by adjusting the sizes,
where they are located, and what is listed.
Move any tile by clicking and dragging the tile. While
moving a tile, if you need a larger view of the Start screen
move the tile towards the top or bottom of the screen to zoom
out.
Use your mouse wheel to scroll left-to-right through your
tiles.
Any Desktop shortcut or program
can be pinned to the Start screen by right-clicking the icon and
choosing Pin to Start.
In the bottom right-hand corner of the start screen is a
magnifying glass with tiles, click this icon to get a zoomed out
view of your Start screen. In this view, if you right-click on a
group of tiles you'll be given the option to name group,
which can be useful if you have a group of related tiles (e.g.
games). In this view, you can also click and drag a group to
organize your tile groups.
Create a new speed bump
between tile groups by moving a tile to a speed bump.
Resize any User tile or Live tile by right-clicking the tile
and choosing resize.
If there is a tile you want on your Taskbar, right-click the
tile and choose Pin to taskbar.
Show admin applications on the Start screen by clicking
Settings in Charms, click Settings, and change the Show
administrative tools from No to Yes.
In Internet Explorer 10, you can also pin any of your
favorite web pages to your Start Screen.
Windows 8 keyboard shortcuts
Knowing at least some of the Windows 8 keyboard shortcuts will make your Windows 8 experience much more enjoyable.
Try to memorize these top Windows 8 shortcut keys.
Press the Windows key
to
open the Start screen or switch to the
Desktop (if open).
Press the
Windows key + D will open the Windows Desktop.
Press the Windows key + . to pin and unpin Windows
apps on the side of the screen.
Press the Windows key + X to open the power user
menu, which gives you access to many of the features most power
users would want (e.g. Device Manager and Command Prompt).
Press the Windows key + C to open the
Charms.
Press the Windows key + I to open the Settings, which is the same Settings found
in Charms.
Press and hold the Windows key + Tab to show open
apps.
Press the Windows key + Print screen to create a
screen shot, which is
automatically saved into your My Pictures folder.
See our Windows shortcuts page
for a full listing of all Windows shortcuts.
Know your hot corners
The corners on your screen are hot corners and give
you access to different Windows features. Below, is a brief
explanation of each of these corners.
Bottom Left-hand corner
The bottom left-hand hot corner of the screen will
allow you to access the Start screen, if you're in the Start screen
and have the Desktop open, this corner will open the Desktop from
the Start screen.
Tip: Right-clicking in the
left hand corner will open the power user menu.
Top-left corner of the screen
Moving the mouse to the top-left corner and then down
will display all the apps running on the computer. Clicking and
dragging any of these apps to the left or right-hand side of the
screen will snap that app to that side of the screen. Each of these
open app icons can also be right-clicked to close or snap.
Right-hand side of the screen
On the full right-hand side of the screen will be
given access to the Windows
Charms.
Taking advantage of search
The Search in Windows 8 has been significantly improved when
compared to all previous versions of Windows.
To search for a file or run a program in Windows 8 from the Start screen
just start typing what you're trying to find or want to run.
As you
begin typing, the results will start appearing on the left-hand
side. In addition to being able to search for files and run
programs, the Search also supports limiting the search to apps
such as Finance, People, Maps, Photos, Mail, Music, Videos,
Weather, and much more. If what you are searching for is not a
file or program, click on the app you wish to use as the search.
For example, if you were searching for "New York" and selected
the Weather App you would be shown the weather in New York, NY.
By default, Search organizes the available Apps by how frequently
they are used and then in alphabetical order. If you want to keep
your favorite app at the top of the Search list, right-click the app and
choose Pin. Pinning the app will lock it in place
regardless of how often it is used. If there is an app you don't
want (e.g. Finance) you can
turn on and off any of the search apps through the PC settings,
which is found under the Settings in the
Charms.
Bonus tip: The Search is also found
through Charms and can
also be opened by pressing Windows key + F.
Running two apps side by side
Any app can be pinned to the left or right-hand side of the
screen. For example, open the People app and then press the
Windows Key + . (period) to move that app to the right-hand
side of the screen, pressing the same keys again will move it to
the left-hand side, and pressing the same keys again will make
it full screen. While an app is pinned, any other app or program
can be opened and loaded into the available space on the screen.
For example, in the below picture, we've opened a browser window
and have the People app running to monitor our social networks.
Any open app can also be pinned using your mouse by
clicking at the top of the tile and dragging it to the left or
right-hand side of the screen.
Bonus tip: The Desktop can also be
pinned to the left or right-hand side of the screen.
Note: In order for snap to work
properly your resolution must be at least 1,366 x 768.
Windows 8 Task Manager
The Windows 8 Task Manager
has been significantly improved over previous versions of
Windows. Some of the new changes include showing a total percent
usage at the top of your Processes, which makes it easier to
determine total memory and CPU usage, improved Performance
graphs, a Startup tab to see startup processes and their impact
to system performance, and the App history tab (as shown below)
that gives you the total resources an app has used over a period
of time. Press Ctrl + Shift + Esc to start exploring the
new Task Manager.
Use a picture password to log into your computer
Windows 8 includes a new feature called
Picture password,
which allows you to authenticate with the computer using a series
of gestures that include circles, straight lines, and taps.
Enable this feature if you want a new way to access your computer
or have a hard time with passwords.
In the PC settings window click Users and then select
Create a picture password
Bonus tip: A four digit
pin password can also be
created and used to access your computer.
Take advantage of Windows 8 apps
Windows 8 comes included with several apps to help you get the most
from your computer. Below are just a few of the
included apps.
People
Microsoft touts the People feature in Windows 8 because they
understand how many people are using social networks today. In
the People feature you'll be able to connect your Windows
computer to all the major social networks including
Facebook,
LinkedIn, and
Twitter. Once connected, you can pin the people app
and monitor your social network (as shown below), use People in
Search to find people, and get an overview of what is happening
in all your social
networks.
Reader
The Reader app will give you PDF
support right out of the box.
SkyDrive
The SkyDrive app will give you access to the Microsoft
cloud service SkyDrive, which allows you
to store your photos, documents, and other files in the
cloud and
access or share those files with any computer with Internet
access.
Store
Take advantage of the Windows Store and install one or more of
the thousands of available apps designed for Windows 8. The Store
is found in the Start screen, or use Search to search
the Store app for any apps that you are trying to find.
Know the answers to common questions
Windows 8 is the biggest change to Microsoft Windows since the
introduction of Windows 95, which was released all the way back
in 1995. Since so many people
have grown up with Windows, it can be difficult to transition to
a new way of doing things. Below, is a short list of the most
common questions previous Windows users will have.
Dear Friends aap jab pc pay work kar
rahay hotay hain to different kisam ki errors show hotay hain. Kisi program ko
close karo to Send Error Report ka option aa jata hy, wesay hi agar aap nay 1
hi program ki kaafi documents open ki hui hain to tab bhi Send Error Report ka
option screen pay show ho jata hy. Me aap ko computers ki already kayi tips and
tricks bata chukka hoon. Aaj aik little new trick k saath hazir hoon.
Basically ye good hy magar aap ko is k
solution nahi pata aor direct close karna chahtay hain yani next time kabhi bhi
aap k pc screen pay show na ho to me aap ko is ka aik method batata hoon jis
say Send Error Report say nijaat mil jaye gi,, aor ye kaam me aap ko Windows XP me kar k dikhaon ga. Just follow
these steps:
iii)Now
we will click on Error Reporting , to click on that Button we will able to
handle error reports.
To Click on Error Reporting a new Box
will appear there, Now we will click on Disable Error Reporting & Then Ok.
That’s it. We Done it . We click on
Apply & then Ok. Our task has been complete. Keep working & if you like
this post please share your comments below.
Salam Friends , Today i'm going to share one a big site reiview there, you can track any sim & send large number of fake messages, Message delivery at 15.000 sms/sec, more than 850 networks, more than 200 countries!
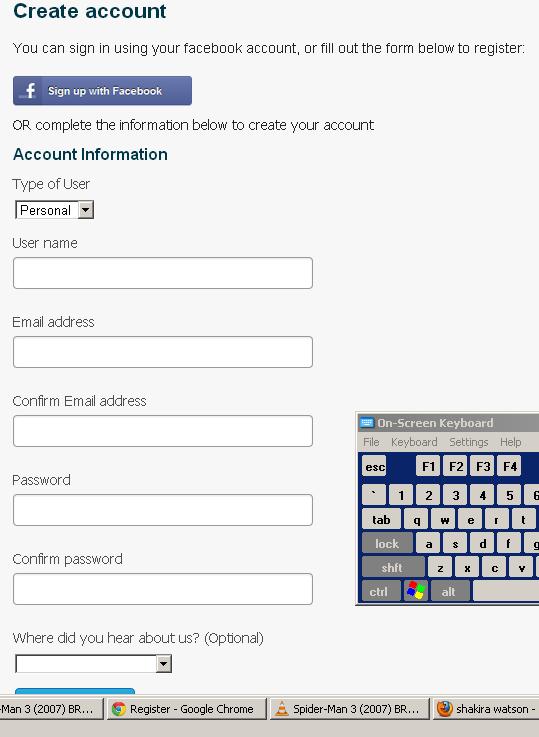
Now you will get a window to register an account, you will register there & you will login there as picture as shown below.
Now after activating your account you will saw a picture same like that as a deshboard on your account , you are login there & now you may send large number of fast sms & fake sms & also sim tracking .
You may enjoy this to get a nice Windows program like a sms bomber etc. this is large amount of tricks on this site , just use your mind & play with this site.
Salam Friends today i'm going to share a little tut about fake texting (fake-sms), this is a new trick to show a latest tip for fake texting. Just click on below link & follow some steps for guideness for fake texting.
There you will sign up & create a free account. this is windows program.
there you gat an free account with 5 credit , there a tip you will get 10 credit if you like there a page of that site, this is easy to use & you may send sms from any number to any number & any name to any number. This is a cheat site if you work on this. Thanks a little tut reading. comment if you like this.
Ye Program Windows me mojood Drive Space show karnay k liye use kiya jata hy , We can use this software to show Drive's Space in our PC Windows.
I've shared some pictures of this software as to use in xp or any other program about its working step by step. This is not a temproary program, it will work completely when PC is on & in working. There is little bit spce get to fill thin C Drive or either there you want. Lots of same softwares are in market now but this is a perfect program to show drive's space after installing this program. You can easily remove this program from your Control Panel Option (Add / Remove Program) . There is a simple step:
1) This is the 1st view of Drive, when we open My Computer in XP then this type of drives shows there. Now you can't imagine about these drive's space, but we are working on this topic there so here we go.
2) in this step we are going to install this program , just open the setup & click there on OK , because we are selecting there Language to install this application so we shall click on OK.
3) Now Just little click on NEXT
4) Now we shall click on I Agree button to continue this step
5) Now we shall chosse the path where we want to install this application & also there is a point to note it out that in this appeard step you can see that option about the required installing path drive space, where you are going to install this program you will see the space of that drive properly.
6) Now just one click on Finish to start this program & it will run automaticaly & start work on pc when it will complete end its own setup.
Here we go. That's it. Our installation is complete , & now we just saw its result to working on our PC.
in this picture it is working properly to show its memory space idea that how much it have avial to use & how many not.
Windows is a family of operating systems developed by Microsoft Corporation for personal computers Windows dominates the personal computer world, running, by some estimates, on 90% of all personal computers. Windows provides a graphical user interface (GUI), virtual memory management, multitasking, and function of the operating system, it lets you look into your computer, just like looking through a window.
Microsoft introduced following popular versions of Windows: 1. Windows 3.1 2. Windows 95 3. Windows 98 4. Windows 2000 5. Windows Me 6. Windows XP 7. Windows Vista 8. Windows 7
Windows VISTA: Microsoft introduced Windows Vista to much fanfare. It represents an evolution from Windows XP Professional and includes many new features and system requrements. With those new features comes some new complexity - and combined with Microsoft Office 2007 - a new understanding of how everything works together. Vista is the biggest change in the GUI in years and learning some of the time saving techiques will help you be more productive with the new Operating System. Windows VISTA helps youorganize all of the files and programs wihin your computer. Think of Windows as a large paper filing cabnit, you have hanging files labeled in a logical order. Within those hanging files, you have manila file folders that contain subsets of information. Windows allows you to accomplish the same system in an electronic format. You can open, sort, move print, rename, find or delete files easily. In addition to managing your files, folders, and applications, Windows has much more to offer.
What is Aero? The AERO interface, which stands for Authentic, Energetic, Reflective, and Open, gives users a crisp new graphical user interface in Windows Vista. Tha Windows Flip and Flip 3D options are only available under the AERO interface and allow for easier access to open information in you desktop. To see these functions in action, click the ALT + Tab key combination to shuffle through the Live thumbnails of your applications. In addition to the Windows Flip, Windows Vista allows users to go through open windows in a 3D mode. The 3D flip mode activates using the Windows key + Tab.
is thread me aap ko computer ki latest tips tricks cheats k baray me bataon ga.. kuch chezin aesi hain jo boht say log abhi bhi nahi jantay..aor ziyada tar log jan'nay ki koshish bhi nai kartay. well topic ki taraf atay hain...
Since defragging the disk won't do much to improve Windows XP performance, here are 23 suggestions that will. Each can enhance the performance and reliability of your customers' PCs. Best of all, most of them will cost you nothing. 1.) To decrease a system's boot time and increase system performance, use the money you save by not buying defragmentation software -- the built-in Windows defragmenter works just fine -- and instead equip the computer with an Ultra-133 or Serial ATA hard drive with 8-MB cache buffer. 2.) If a PC has less than 512 MB of RAM, add more memory. This is a relatively inexpensive and easy upgrade that can dramatically improve system performance. 3.) Ensure that Windows XP is utilizing the NTFS file system. If you're not sure, here's how to check: First, double-click the My Computer icon, right-click on the C: Drive, then select Properties. Next, examine the File System type; if it says FAT32, then back-up any important data. Next, click Start, click Run, type CMD, and then click OK. At the prompt, type CONVERT C: /FS:NTFS and press the Enter key. This process may take a while; it's important that the computer be uninterrupted and virus-free. The file system used by the bootable drive will be either FAT32 or NTFS. I highly recommend NTFS for its superior security, reliability, and efficiency with larger disk drives. 4.) Disable file indexing. The indexing service extracts information from documents and other files on the hard drive and creates a "searchable keyword index." As you can imagine, this process can be quite taxing on any system. The idea is that the user can search for a word, phrase, or property inside a document, should they have hundreds or thousands of documents and not know the file name of the document they want. Windows XP's built-in search functionality can still perform these kinds of searches without the Indexing service. It just takes longer. The OS has to open each file at the time of the request to help find what the user is looking for. Most people never need this feature of search. Those who do are typically in a large corporate environment where thousands of documents are located on at least one server. But if you're a typical system builder, most of your clients are small and medium businesses. And if your clients have no need for this search feature, I recommend disabling it. Here's how: First, double-click the My Computer icon. Next, right-click on the C: Drive, then select Properties. Uncheck "Allow Indexing Service to index this disk for fast file searching." Next, apply changes to "C: subfolders and files," and click OK. If a warning or error message appears (such as "Access is denied"), click the Ignore All button. 5.) Update the PC's video and motherboard chipset drivers. Also, update and configure the BIOS. For more information on how to configure your BIOS properly, see this article on my site. 6.) Empty the Windows Prefetch folder every three months or so. Windows XP can "prefetch" portions of data and applications that are used frequently. This makes processes appear to load faster when called upon by the user. That's fine. But over time, the prefetch folder may become overloaded with references to files and applications no longer in use. When that happens, Windows XP is wasting time, and slowing system performance, by pre-loading them. Nothing critical is in this folder, and the entire contents are safe to delete. 7.) Once a month, run a disk cleanup. Here's how: Double-click the My Computer icon. Then right-click on the C: drive and select Properties. Click the Disk Cleanup button -- it's just to the right of the Capacity pie graph -- and delete all temporary files. 8.) In your Device Manager, double-click on the IDE ATA/ATAPI Controllers device, and ensure that DMA is enabled for each drive you have connected to the Primary and Secondary controller. Do this by double-clicking on Primary IDE Channel. Then click the Advanced Settings tab. Ensure the Transfer Mode is set to "DMA if available" for both Device 0 and Device 1. Then repeat this process with the Secondary IDE Channel. 9.) Upgrade the cabling. As hard-drive technology improves, the cabling requirements to achieve these performance boosts have become more stringent. Be sure to use 80-wire Ultra-133 cables on all of your IDE devices with the connectors properly assigned to the matching Master/Slave/Motherboard sockets. A single device must be at the end of the cable; connecting a single drive to the middle connector on a ribbon cable will cause signaling problems. With Ultra DMA hard drives, these signaling problems will prevent the drive from performing at its maximum potential. Also, because these cables inherently support "cable select," the location of each drive on the cable is important. For these reasons, the cable is designed so drive positioning is explicitly clear. 10.) Remove all spyware from the computer. Use free programs such as AdAware by Lavasoft or SpyBot Search & Destroy. Once these programs are installed, be sure to check for and download any updates before starting your search. Anything either program finds can be safely removed. Any free software that requires spyware to run will no longer function once the spyware portion has been removed; if your customer really wants the program even though it contains spyware, simply reinstall it. For more information on removing Spyware visit this Web Pro News page. 11.) Remove any unnecessary programs and/or items from Windows Startup routine using the MSCONFIG utility. Here's how: First, click Start, click Run, type MSCONFIG, and click OK. Click the StartUp tab, then uncheck any items you don't want to start when Windows starts. Unsure what some items are? Visit the WinTasks Process Library. It contains known system processes, applications, as well as spyware references and explanations. Or quickly identify them by searching for the filenames using Google or another Web search engine. 12.) Remove any unnecessary or unused programs from the Add/Remove Programs section of the Control Panel. 13.) Turn off any and all unnecessary animations, and disable active desktop. In fact, for optimal performance, turn off all animations. Windows XP offers many different settings in this area. Here's how to do it: First click on the System icon in the Control Panel. Next, click on the Advanced tab. Select the Settings button located under Performance. Feel free to play around with the options offered here, as nothing you can change will alter the reliability of the computer -- only its responsiveness. 14.) If your customer is an advanced user who is comfortable editing their registry, try some of the performance registry tweaks offered at Tweak XP. 15.) Visit Microsoft's Windows update site regularly, and download all updates labeled Critical. Download any optional updates at your discretion. 16.) Update the customer's anti-virus software on a weekly, even daily, basis. Make sure they have only one anti-virus software package installed. Mixing anti-virus software is a sure way to spell disaster for performance and reliability. 17.) Make sure the customer has fewer than 500 type fonts installed on their computer. The more fonts they have, the slower the system will become. While Windows XP handles fonts much more efficiently than did the previous versions of Windows, too many fonts -- that is, anything over 500 -- will noticeably tax the system. 18.) Do not partition the hard drive. Windows XP's NTFS file system runs more efficiently on one large partition. The data is no safer on a separate partition, and a reformat is never necessary to reinstall an operating system. The same excuses people offer for using partitions apply to using a folder instead. For example, instead of putting all your data on the D: drive, put it in a folder called "D drive." You'll achieve the same organizational benefits that a separate partition offers, but without the degradation in system performance. Also, your free space won't be limited by the size of the partition; instead, it will be limited by the size of the entire hard drive. This means you won't need to resize any partitions, ever. That task can be time-consuming and also can result in lost data. 19.) Check the system's RAM to ensure it is operating properly. I recommend using a free program called MemTest86. The download will make a bootable CD or diskette (your choice), which will run 10 extensive tests on the PC's memory automatically after you boot to the disk you created. Allow all tests to run until at least three passes of the 10 tests are completed. If the program encounters any errors, turn off and unplug the computer, remove a stick of memory (assuming you have more than one), and run the test again. Remember, bad memory cannot be repaired, but only replaced. 20.) If the PC has a CD or DVD recorder, check the drive manufacturer's Web site for updated firmware. In some cases you'll be able to upgrade the recorder to a faster speed. Best of all, it's free. 21.) Disable unnecessary services. Windows XP loads a lot of services that your customer most likely does not need. To determine which services you can disable for your client, visit the Black Viper site for Windows XP configurations. 22.) If you're sick of a single Windows Explorer window crashing and then taking the rest of your OS down with it, then follow this tip: open My Computer, click on Tools, then Folder Options. Now click on the View tab. Scroll down to "Launch folder windows in a separate process," and enable this option. You'll have to reboot your machine for this option to take effect. 23.) At least once a year, open the computer's cases and blow out all the dust and debris. While you're in there, check that all the fans are turning properly. Also inspect the motherboard capacitors for bulging or leaks. For more information on this leaking-capacitor phenomena, you can read numerous articles on my site. Following any of these suggestions should result in noticeable improvements to the performance and reliability of your customers' computers. If you still want to defrag a disk, remember that the main benefit will be to make your data more retrievable in the event of a crashed drive.
Disable turn off button in Windows XP: Simply ye method Windows XP me hi use hota hy kion k is me XP k Path show kiya gaya hy 1. Start button and type regedit in Run option then press Enter for next. 2. Here locate the location to: HKEY§CURRENT§USER?/Software?/Microsoft?/Windows?/Curre ntVersion?/Policies?/Explorer 3. Here in right side panel, right click to create a new DWORD value with the name NoClose. 4. Now assign number 1 in value data box and close the registry editor. 5. Now close the registry editor and restart your computer after any changes to go into effect
1. Close the current window - Ctrl+W 2. Update the current Web page - Ctrl+P 4. Open the Open dialog box - Ctrl+O The same as Ctrl+L 5. Start another instance of the browser with the same web address - Ctrl+N 6. Open the Favorites bar - Ctrl+I 7. Open the History bar - Ctrl+H 8. Start the Find Utility - Ctrl+F 9. Open the Search bar - Ctrl+E 11. Copy - Ctrl+C 12. Cut - Ctrl+X 13. Paste - Ctrl+V 14. Undo - Ctrl+Z 15. Delete - Delete 16. Delete the selected item permanently without placing the item in the Recycle Bin - Shift+Delete 17. Whle dragging an item (Copy the selected item) - CTRL 18. While dragging an item (Create a shortcut to the selected item) - Ctrl+Shift 19. Rename the selected item - F2 20. Open the Help topic, if any, for the selected item - F1